Setup
To use the APIs you'll typically need the following:
- A Quix Cloud account.
Start for free
Book a session with us to start for free.
We will create a time-limited free account for you, and our experts will help you get started with your specific use case.
-
Obtain a Personal Access Token - you need this to authenticate requests.
-
Get your environment ID - you need this for request URLs.
-
View the API reference documentation.
-
If you intend to use WebSockets, and the API supports it, you'll need to install SignalR.
Each of these is described in the following sections.
Project settings
Useful information can also be found in the settings panels for your environment:
-
Click
Settingsin the bottom left corner of the UI. -
From
Project settingsselect the environment you are working with. -
Click
APIs and tokens.
You are now presented with a very useful panel. From here you have useful links to items such as API documentation (rendered with Swagger), as well as your Personal Access Tokens (PATs):
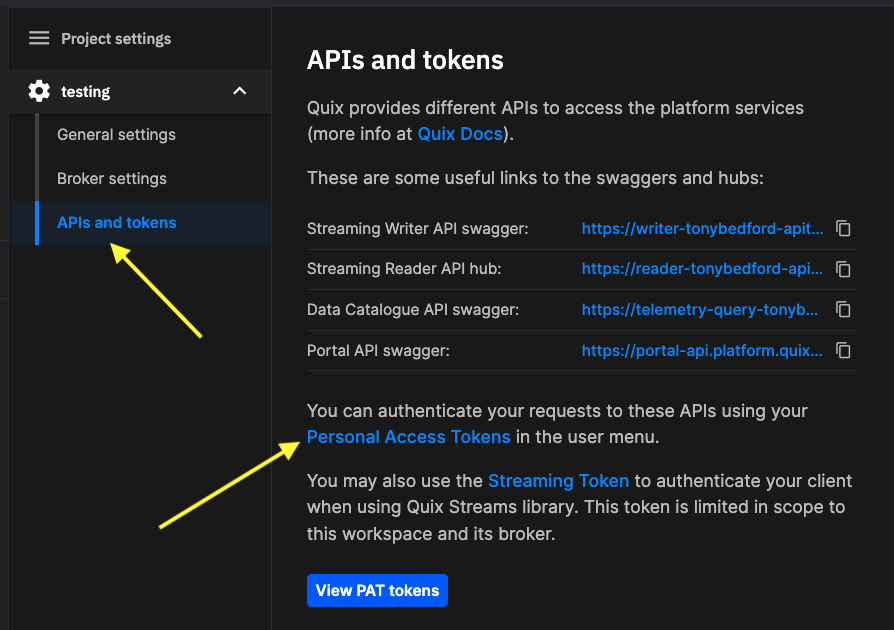
Personal access token (PAT)
Personal Access Tokens, or PATs, are bearer tokens that can be used to authenticate the various Quix APIs, such as the Portal API.
To obtain a PAT, log in to Quix, and click on your profile icon in the top right corner, then click Personal Access Tokens. You can then generate a PAT with a lifetime suitable for your use case.
Alternatively, log in to Quix, and click Settings in the main left-hand navigation. Then, for a specific environment, click APIs and tokens.
In the APIs and tokens dialog, you can click Personal Access Tokens to generate PATs, or a Streaming Token (SDK Token) for use with the Quix Streams client library.
Get environment ID
When using APIs you’ll need to obtain an ID based on a specific environment. For example, endpoints for the Query API use a domain with the following pattern:
https://telemetry-query-${environment-id}.platform.quix.io/
The environment ID is a combination of your organization and environment names, converted to URL friendly values.
Obtain your environment ID from the URL
-
Go to the Portal home.
-
Locate the environment you’re interested in and open it.
-
At this point, take note of the URL. It will be in the form:
https://portal.cloud.quix.io/home?workspace={environment-id}
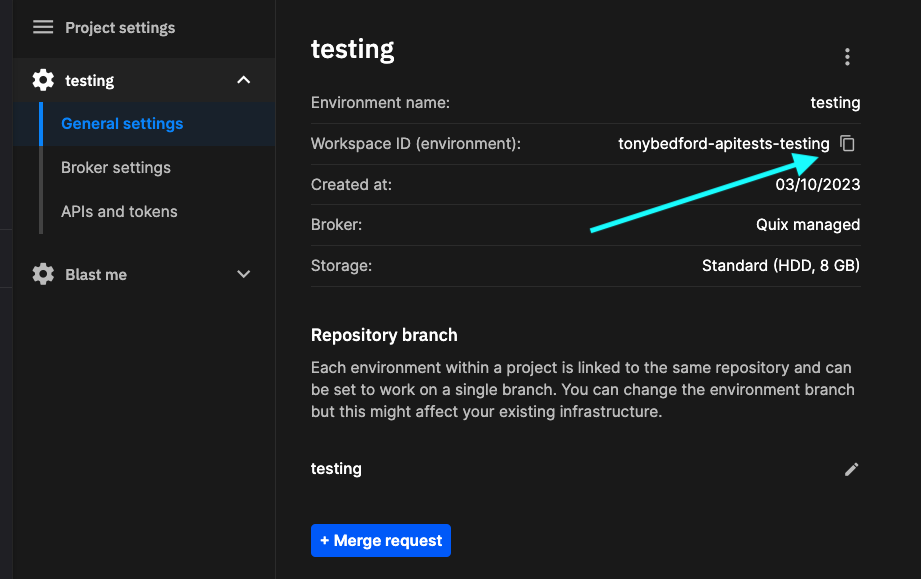
Obtain environment ID from settings
You can also get the environment ID from Settings. Click Settings in the bottom-left corner of the portal, select the environment of interest. You can then copy the environment ID (previously known as the workspace ID) from the settings panel, as shown in the following screenshot:
Example environment ID
Given the following URL for the environment:
The environment ID is:
The components of the environment ID are as follows:
| joeengland | The name of the Quix account, known as the organization, in this case the personal account of Joe England | | apitests | The name of the project | | testing | The name of the environment |
Copy the value for environment-id and use it wherever you need an environment ID.
Note
The workspace= parameter in the URL https://portal.cloud.quix.io/home?workspace={environment-id} is there for legacy reasons, and does in fact indicate an environment.
API reference documentation
An OAS3 API reference guides are available for HTTP/REST APIs. These are rendered using Swagger.
The URLs for the API references are specific to your environment, so you can easily test out API calls on your environment using the API reference. You'll need to get you environment ID. The exception to this is the Portal API, which is account-wide.
| API | API reference URL (Swagger documentation) |
|---|---|
| Streaming Writer | https://writer-<environment-id>.platform.quix.io/swagger |
| Streaming Reader | No HTTP/REST interface - SignalR (WebSockets or Long Polling) |
| Portal | https://portal-api.platform.quix.io/swagger |
| Query | https://telemetry-query-<environment-id>.platform.quix.io/swagger |
Replace <environment-id> with your environment ID.
Tip
Once you access the API reference, you can select the version of the API you require from the Select a definition dropdown list.
Set up SignalR
Microsoft SignalR enables real-time bi-directional communication between Quix and a client. The underlying transport used is either WebSockets or Long POlling, depending on the client's capabilities.
You'll use SignalR where you need high speed, real-time, communication between Quix and the client, as typically the request-response model of the HTTP/REST approach does not scale to this use case.
This page explains how to set up Microsoft SignalR.
Installation
You can install SignalR using npm (for Node.js applications) or using a CDN (for web browser applications):
If you are using a package manager such as npm, you can install SignalR using:
Testing the connection
Once you’ve installed the SignalR library, you can test it with the following code snippet. This opens a connection to the hub running on your custom subdomain, and checks authentication.
You should replace the text YOUR_PAT with your PAT.
You should also replace YOUR_ENVIRONMENT_ID with your environment ID.
var signalR = require("@microsoft/signalr");
const token = "YOUR_PAT"
const environmentId = "YOUR_ENVIRONMENT_ID"

const options = {
    accessTokenFactory: () => token
};

const connection = new signalR.HubConnectionBuilder()
    .withUrl("https://writer-" + environmentId + ".platform.quix.io/hub", options)
    .build();

connection.start().then(() => console.log("SignalR connected."));
var signalR = require("@microsoft/signalr");

const options = {
    accessTokenFactory: () => 'YOUR_PAT'
};

const connection = new signalR.HubConnectionBuilder()
    .withUrl("https://reader-YOUR_ENVIRONMNENT_ID.platform.quix.io/hub", options)
    .build();

connection.start().then(() => console.log("SignalR connected."));
If the connection is successful, you see the console log "SignalR connected".
Tip
Also available as JsFiddle at https://jsfiddle.net/QuixAI/L9ha4p5j/